Online Help

5 Best Snapdragon Optimized Browsers You Should Use

Posted by asish p in: Android Tricks Customize
When buying a new phone, we keep a tab on various specifications and one of them is the processor. We always make sure that the Android smartphone we are buying packs in the latest processor on-board. Well,that’s pretty obvious, considering the latest powerful processors bring great power as well as lesser battery drain. Now, when it comes to chipsets on Android smartphones, Qualcomm’s Snapdragon line-up is arguably the most popular out of the lot. The Snapdragon line of processors have made a name, thanks to their reliable & efficient processors and also due to their specific technologies.
If we talk about powerful web browsers on Android, it’s Google Chrome that tops it off. But, it can be made faster using certain optimizations that are made available by Qualcomm for their Snapdragon processors. Making use of the open-source Chromium code, developers can build browsers that will perform even better on Snapdragon-powered devices. So, if you happen to have an Android smartphone powered by a Snapdragon chipset, then here’s our list of the 5 best Snapdragon optimized browsers:
Note: The following browsers will also work on devices that are not powered by Snapdragon chipset. The only difference you’ll get to see is the performance. Apart from that, all the browsers are based on Chromium, so the browsers listed below share the same set of features with the difference being the design and how well it is optimized. To break down the list down, I’ve mentioned the time taken by each browser to load a web page.

Chromium Features

As all of them share the same set of features, here’s the list of features that are available in Chromium:
  • Change Primary Search Engine
  • Web Refiner
  • Safe Browsing – Protects your device from dangerous sites.
  • Secure Connect – Automatically use HTTPS when loading pages.
  • Automatic Security Updates for the browser
  • Google Sync

1. YuBrowser

YuBrowser is a fairly new browser but it’s already a favorite for many. The app features a bright design and a tabbed interface on the home page. You can sign in to your Google account to sync your Bookmarks and History. The design is quite similar to Chrome and there are features like swiping on the edge to navigate, just like Chrome but there are some added features. You can tap on the site icon in the top-left corner to open the security settings available for that site.

Talking about page loading speed, I tested it on my 2Mbps WiFi network and here are the page loading times for the first time (which means no saved cache) and the second time (when the website is cached). I loaded our Beebom homepage.
No Cache (First time loading the site) – 16.04 seconds
After it’s Cached – 5.09 seconds
However, the main content of the web page was fully loaded in 8-9 seconds during the first time loading of the site.


Download
Click here
2. Pyrope Browser
The Pyrope Browser is based on CyanogenMod’s “Gello” browser & Chromium and it’s Snapdragon optimized. Along with the usual Chromium features, it includes a unique multiple tabs design and boasts of features like power saving mode, background audio, edge navigation, dynamic notification bar and more. The three-dot menu panel is different too, as the Favorites, History and Saved Tabs are clubbed together. Apart from that, the option for ‘Close other Tabs’ comes in really handy when you want to start browsing something new and fresh and you want all the other tabs closed.


Download
Click here

3. Chromium build by Arter97

Now, this is a Chromium build that is developed by one of the most popular developers at XDA – Arter97. This browser is specifically built for Snapdragon Processors that are powered by Krait/Kryo engines. It’s based on Chromium v54 and while it’s probably not going to be updated, as per the developer, it’s still a great browser for Snapdragon powered devices. Along with the usual Chromium features and Snapdragon optimisation, the browser offers features like dark mode, swipe gestures etc. Apart from that, in order to make the app run properly, you’ll need to first enable all the permissions for the app from the Permission manager of your phone. You can check out all the details from this XDA thread.


Download
Click here
4. Browser by Jswarts

This browser built by developer Jswarts is just a simple Snapdragon optimized Chromium browser but thanks to various under the hood changes by JSwarts, it’s amazingly fast. For instance, some excessive debugging from Chromium is removed for better speed. It took only 11.04 seconds to open our Beebom webpage and just around 4-5 seconds to completely load the actual content. It’s by far the fastest browser I’ve ever used. You can download it from XDA Labs app or grab the APK from the link below.


Download
Click here
5. Rbrowser

Rbrowser is pretty much the same to other Chromium browser when it comes to features but, what’s different is the design. It brings back the old classic browser look that we had during Android 4.0 Ice Cream Sandwich and Android 4.1 Jelly bean. Apart from that, there’s obviously Snapdragon optimization, as it’s a version of CAF browser/SWE browser. You also get a quick shortcut to open a new Incognito tab and the settings are well organized for you to explore.


Download
Click here

Use these browsers on your Snapdragon-powered device

Google Chrome is for sure the de facto standard for web browsing on Android devices. But, using it’s optimized version is not a bad idea. If you own an Android device powered by a Snapdragon processor, these Snapdragon optimized browsers should give you a decent performance boost when compared to the regular Chrome browser. Also, all the browsers listed above support Google Sync, so you will definitely get the complete Google experience. Also, if you want to improve the performance even further, you should disable the ‘Secure Connect’ and ‘Allow security updates over cellular networks’ in the settings.
So,  try them out and let us know which Snapdragon optimized browser will you choose for your Snapdragon powered device. Sound off in the comments section below.

Friends, If You Like The Post Kindly Comment Below The Post And Do Share Your Response, Thanks For Reading.. ๐Ÿ‘ ๐Ÿ‘ฒ

How to Enable OTG Support on Any Android Smartphone

Posted by asish p in: Android Tricks
Do you want to Enable OTG Cable support in your android device ? And want to connect otg cable to any android device ? if yes the you are at right place . Today we are here with the guide on How to Enable USb OTG Cable connection on Any android smartphone .
OTG also known as " ON THE GO " is basically a feature with which you can connect Pen drive to android phone using OTG support feature . Many Smartphones already come with OTG Support enabled by default but some smartphone's need to enable OTG support in Android Phone manually . So in this guide we will tell you Ways to Enable OTG feature in any android smartphone without root .


Add-otg-support-to-any-android-device-without-root

How to Add Otg support to Any Android Phone without Root 

Initially OTG support is a based on Capable hardware and it has nothing to do with Software but still there are many smartphones that have capabilities of Having otg support but it is not enabled by the manufacturer so we can use some trick to Add OTG support on any android device without root .

So before going to the Guide Have a look at :- 

What is OTG Support in Android Mobiles ?

OTG support also Known as ON THE GO support is a feature in android smartphones that allow to connect Usb pendrive, Printers, Mouse and almost every usb device to your android smartphone . 


Do all android smartphones support USB Otg ?

No , OTG support was first used in 2001 and since then many companies are using this feature in their android smartphones . Many smartphones came with Otg capable hardware but the feature is disabled by companies so in that case we need to Activate OTG support manually .

Is it Possible to Add OTG support to Android mobile without root ?

Yes you can enable OTG support on Non rooted android device , But as already mentioned earlier that OTG support for android mobile depends upon  Hardware So in this guide will work only for the smartphones which have OTG supported Hardware .

In many smartphones you can also add otg support in kernel but it is a bit of very complicatedprocedure to make kernel support otg . So in this guide of How to enable otg support for android mobiles we will tell you different ways which are easy .

How to Enable OTG Support for Android Mobiles .

  • First of all Download USB OTG support checker app from playstore . 
  • Now you have to Check if your smartphone supports OTG or not .
  • Open the app , Now you will see a option Check Usb OTG support :- 
Add-otg-support-to-any-android-device-without-root

  • Now the Process will start and you will get a message " Checking " .
Add-otg-support-to-any-android-device-without-root
  • After sometime you will get A notification saying " Your device supports OTG support " . 
Add-otg-support-to-any-android-device-without-root

  • Now when you have confirmed that your android mobile support otg then you can proceed further . 
The stock file manager given in the android smartphones doesn't support otg and therefore users think that their smartphone doesn't support Otg . So to Use OTG in a non rooted smartphone you can use Es file explorer . 

  • First of all Download Es File explorer from Playstore .
  • Now connect the USB otg cable with the device attached you want to connect to android .
  • Now Insert the OTG cable in Charging port . 
  • Now Open Es file explorer . 
  • Now You will get a notification asking " Enable USB otg support " 
Add-otg-support-to-any-android-device-without-root
  • As soon as you tap on Yes the es file explorer will show you usb Storage folder .
Add-otg-support-to-any-android-device-without-root
  • Just open the folder and you will get all files and folder . 
  • Thats all !!! You have successfully Enabled OTG support in android mobile .
Use Otg in any android mobile with root .

Rooted users can simply use a App named USB OTG Helper all you need is just download the App and open it . After opening you have to connect your OTG cable and the device will enable otg support in rooted mobile . 


So this was our guide on How to Enable OTG support on Android Mobile without root . I hope this guide Helped you . 

Friends, If You Like The Post Kindly Comment Below The Post And Do Share Your Response, Thanks For Reading.. ๐Ÿ‘ ๐Ÿ‘ฒ

{EXPIRED} Trick to Get Oneplus 3T for 1 Rupees in Oneplus 3T December Dash Flash Sale + Unlimited Trick

Posted by asish p in: Deals & Earn 3 Comments
OnePlus 3T is the latest model Smartphone from Oppo. Recently OnePlus Diwali dash sale has been completed in in the month of October. Now, to amaze the clients OnePlus is now offering the December dash sale 2016. There is a change to win OnePlus 3T Samrtphone @ Rs 1 in OnePlus Diwali Dash Sale 2016. The OnePlue Rs 1 December Dash Sale will be held during 9th December – 30thDecember 2016. Hurry up! This is the great offer to win the OnePlus 3T at Rs 1.


OnePlus 3T 1 Rupee December Sale 2016 – Registration, Process, Terms & Conditions

Visit OnePlus 3T December Dash sale page.
Scroll Down and Complete these tasks to participate in OnePlus 3T December Dash Sale:- Sign in, Verify Mobile, Add Address & Share.

Login / Sign Up into OnePlus Application https://oneplusstore.in/
Verify your mobile number by filling OTP.
Provide your shipping address.
Finally share this on Facebook, Twitter and all social media with #3TDecDash hashtag.
Rs. 1 sale will start on 12PM-6PM (IST) every friday December (9, 16, 23, 30). Visit https://oneplusstore.in/december
Click on ‘Claim now’ button to claim prize.
Buy One Plus 3T @ Re 1 Flash Sale Here

How To Get 1 rs Oneplus 3T Mobile @ Amazon.com :

  • Visit the oneplus 3T December dash flash sale page.
  • Then enter into that challenge to gain your first point
  • After that invite your friends to minimum of get 300 points
  • Then install Flipshope extension to participate in Flash sale
  • With the help of extension you will get 1rs Oneplus 3T

OnePlus 3T @ Re 1 December Dash Sale Registration – Complete Order Details

  • Users have the opportunity to win a OnePlus 3T for Rs 1 every week
  • Clients desiring to participate in OnePlus December Dash sale must register before 28th
  • Subscribers can gain 1 point for every person who signs up and completes the Entry Challenge through your share link.
  • Use your points to claim your prize in the Prize Shop! The Prize Shop is open 12 – 6pm (IST) on every Friday in December (9th, 16th, 23rd, and 30th) while stocks last. Prizes may change at any time.
  • Once you’ve claimed your prize, pay Rs 1 within 3 hours to place your order. Prizes that are not paid for expire after 3 hours.
  • You may claim any number of prizes, as long as you have enough points.

Unlimited trick

1. Copy your link and open it from incongnito tab
2. Then just click on sign in and then click on Sign Up tab 
3. Then open Temp email Generator and copy the email id from top
4. Place the email id for sign up and put the details and click on sign up
5. Then refresh the temp email generator and verify your id
6. Then verify with new number
7. Put any adress
Done
Then Close all incongnito tab and then follow process 1-7

Enjoy....


Friends, If You Like The Post Kindly Comment Below The Post And Do Share Your Response, Thanks For Reading.. ๐Ÿ‘ ๐Ÿ‘ฒ

Turn on Phone Screen With Volume Buttons (Android)

Posted by asish p in: Android Tricks
Turn on phone screen by volume keys: Hey Guys, In This Guide I will tell you about How can you wake up your android device screen with volume buttons. If you have one android device, and power button of your device is broken or not working properly then you can use this simple app. This Simple app can fix your android device power button issue. There are some android devices have inbuilt feature of unloking android by press volume keys, but most of the android devices doesn’t have this feature. Don’t worry, you can add this feature in your existing android device with the help of simple android app which is described below.


You can Actually Turn on your android device’s screen easily with the help of simple android app which is described below. This app is one of the best app which you should install in your android device if power button of your device is broken. The Best Thing is, this app doesn’t need any root permissions to work. So Simply use this app and click on start button and it will allow you to unlock your android device via Volume Keys. If Power button of your android device is not working properly, then there are lots of other ways to unlock it like plug it in charger or to pc via data cable, it will turn screen on etc. But every time you can not turn on your phone’s screen via charger etc.
So Here we have one simple android app, Which you can use for unlock / wake up your android phone with data cable. The feature of unlocking android phone with volume buttons is also available in some custom roms like cyanogenmod etc. But now you can also add this feature in any other android device with stock rom too with the help of one simple one android app. You can use this app in any android device and it will work. You can use both volume up and down keys in your android for unlock the screen. There are many apps available on Google Play Store for this purpose, but this is the one of the best app ever for this purpose, which I have described below.

How to Wake Up Android Phone With Volume Buttons

For Unlock your android phone with volume buttons, simply follow the below easy steps. After following these steps, you will be able to unlock your android phone’s screen with the help of volume buttons. So Checkout the guide and don’t worry about the broken power button in your android device ๐Ÿ˜€
At First, Download and Install this Volume Key Unlocker app from Play Store
After Open This App, Click on Enable Volume Power which is the first option in this app and enable this option from the app.

After enable it, You can Turn Your Phone’s Screen off and you can turn it on with the help of volume buttons of your android device.

You can also click Start On Boot to run this app every time when you restart device.

.

You can also uninstall this app to disable this function from your device. There is an Option to uninstall this app from the app itself.


Thats it guys..... Enjoy and save your power button to be damaged

Friends, If You Like The Post Kindly Comment Below The Post And Do Share Your Response, Thanks For Reading.. ๐Ÿ‘ ๐Ÿ‘ฒ

How to Enable Fingerprint Gestures on any Android

Posted by asish p in: Android Tricks
Enable Fingerprint Gesture on Android: Hey Guys, in this Tutorial I will tell you about how can you enable Fingerprint Gestures on your Android device. This Tutorial can work on Android Marshmallow 6.0+ Devices only. No Matters, If you have rooted device or not, it will work on both of the Android Devices. But If you have rooted your device, Things can be more better. There are many benefits of rooting your phone, we was also shared tutorial on Things to do after rooting your phone, best apps for rooted android and much more. You may have seen fingerprint Gestures on many Android devices including Google Pixel X.


You can Pull Down or Up the Notification panel of your device with your Fingerprint sensor, Scroll down or up, Click Selfie, Turn off screen and much more. There are some apps available, which you can use on your device for use this functionality. Many devices are coming with fingerprint sensor these days, but all devices doesn’t have features to use fingerprint sensor in more Advanced ways. So Using some third party android apps will do the work for you. So Simply Follow this Tutorial and you will get all info regarding how to enable fingerprint gestures on Android.

How to Enable Fingerprint Gestures on Android

For enable Fingerprint gestures on your Android, you have to follow some easy steps now from below. I have posted step-by-step tutorial with screenshots for easily Understand this Guide. So let’s have a look at it now from below about enabling fingerprint gestures on Android without rooting or or with rooted Android.
Note – This tutorial will work only on Android Marshmallow or Above Devices.
  • At first, Install Fingerprint gestures app from Play Store

  • After Downloading this app on your phone, Simply Open it.

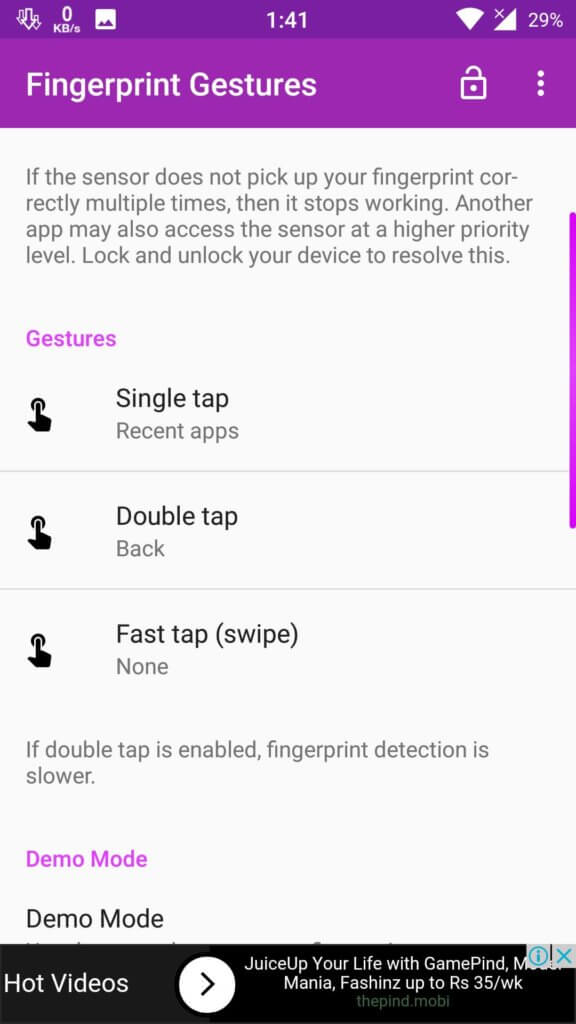
  • After Open this app, click on Enable Fingerprint Gesture button from Top Right.

  • Now Goto your Phone’s Settings – Accessibility and turn on Fingerprint Gestures.

  • Now go back to Fingerprint Gesture app and Choose the options according to your choice.

Just use these features according to your choice. You can do anything with this app. You can also tick the option of allow only registered finger, so gestures will only work with registered finger so no one other can use gestures, anyways this is an optional choice. You can do many great things with the help of this app. There are some other apps are also available which you can use on your Device. You can use Fingerprint Quick Action app is this app have some issues with your device.

For Rooted Users

If you have root access then you can do some more things like Scroll Up or down. You have to allow root permissions to this app first for use some more features.

  • You can Use Features Like Sleep, Scroll Down, Scroll Up etc with this app. But without root too it have great functionality.

Wrapping Up
So Guys, This was the easiest way which you can use for enable fingerprint gestures on your Android. If you have any Questions or suggestions regarding this blog, then simply comment below. I will try to help you out. Thanks for visiting this blog tricks4hacker and stay tuned here for more cool stuff like this.

Friends, If You Like The Post Kindly Comment Below The Post And Do Share Your Response, Thanks For Reading.. ๐Ÿ‘ ๐Ÿ‘ฒ

How Hackers Can use Keyloggers To Hack Accounts

Posted by asish p in: PC Security PC Tricks
Accounts password hacking with keylogger guide for securing. Keyloggers is the best software to hack the accounts of victims that through recording their device when they will login to their accounts .This software is hidden so that your victim cannot judge it and it also simultaneously works so as to hack the passwords that are recorded and saved in your local storage location.Here in this article you will learn how most hackers use Keyloggers to hack up the accounts succesfully and you will also how you can also do like them.Just follow up the steps given below to know how to do it.


1.Creating server:

First of all you has to create up the keylogger server that will run on the machine of the victim and will capture the keystrokes and mail us on the email account that will be used to build the keylogger.To build up the keylogger server you has to follow the given steps:
a) Download the keylogger and good binder from google.
b) Open the keylogger file and here the Gmail ID and password will be required.
c) Click on the server settings in the keylogger and then enter the time after which you want the report.After that choose the output location and give it any name.
d) After that click on the log and Result settings and then in Log Email Title enter the subject of email also click the last two options i.e add computer name and add victim name.
e) Tap on other options like unclick the message button because on binding it will not show any warning messages.Now click on build keyloggers and after that you will see your keyloggers file at the location that you has given previously.
f) Now your Keylogger server is ready for hacking accounts.

2.Extracting the Icon File from any installer(resourse hacker):

a) Open the resourse hacker folder and then open the reshacker file and then go to its menu and open any setup file.
b) Click on the action button in the menu and then click save all resourses button.This will save all your resourses to desktop or any other location of your choise.It will consist of two files one is icon file and the other one is res file.The Icon file will be required for other steps.
c) Now we have got the Icon of the installer file that will be used further in other steps.

3.Binding the Keylogger server:

a) Go to the keylogger folder and then open the binder and then click on the + button given below to add files.
b) Add the keyloggers server there and the set up of the software.After that Go to settings in the menu of binder.Select the icon that we have generated in the previous step and then set the location of the output file.
c) Again go to the File menu in binder and then click on bind files.
d) Here your Binded Keylogger is ready.The only thing that you has to do now is to spread it to the victims or users that are your friend.

The Keyloggers setup that you will send through various posts or forumns to your victims and after being installed it will send you the anonomous data of their keystrokes that will also contain their logins to the accounts from which you can now find their usernames and the corresponding passwords.

Friends, If You Like The Post Kindly Comment Below The Post And Do Share Your Response, Thanks For Reading.. ๐Ÿ‘ ๐Ÿ‘ฒ
Newer Posts Older Posts Home
Powered by Blogger.

5 Best Snapdragon Optimized Browsers You Should Use

asish p 0 Android Tricks, Customize Sunday, 18 December 2016
5 Best Snapdragon Optimized Browsers You Should Use 5 Best Snapdragon Optimized Browsers You Should Use

When buying a new phone, we keep a tab on various specifications and one of them is the processor. We always make sure that the Android smar...

Read More

How to Enable OTG Support on Any Android Smartphone

asish p 0 Android Tricks Saturday, 17 December 2016
How to Enable OTG Support on Any Android Smartphone How to Enable OTG Support on Any Android Smartphone

Do you want to  Enable OTG Cable support in your android device  ? And want to  connect otg cable to any android device  ? if yes the you ar...

Read More

{EXPIRED} Trick to Get Oneplus 3T for 1 Rupees in Oneplus 3T December Dash Flash Sale + Unlimited Trick

asish p 3 Deals & Earn Sunday, 11 December 2016
{EXPIRED} Trick to Get Oneplus 3T for 1 Rupees in Oneplus 3T December Dash Flash Sale + Unlimited Trick {EXPIRED} Trick to Get Oneplus 3T for 1 Rupees in Oneplus 3T December Dash Flash Sale + Unlimited Trick

OnePlus 3T is the latest model Smartphone from Oppo. Recently OnePlus Diwali dash sale has been completed in in the month of October. Now, t...

Read More

Turn on Phone Screen With Volume Buttons (Android)

asish p 0 Android Tricks Sunday, 4 December 2016
Turn on Phone Screen With Volume Buttons (Android) Turn on Phone Screen With Volume Buttons (Android)

T urn on phone screen by volume keys:  Hey Guys, In This Guide I will tell you about How can you wake up your android device screen with vol...

Read More

How to Enable Fingerprint Gestures on any Android

asish p 0 Android Tricks Friday, 2 December 2016
How to Enable Fingerprint Gestures on any Android How to Enable Fingerprint Gestures on any Android

Enable Fingerprint Gesture on Android : Hey Guys, in this Tutorial I will tell you about how can you enable Fingerprint Gestures on your And...

Read More

How Hackers Can use Keyloggers To Hack Accounts

asish p 0 PC Security, PC Tricks
How Hackers Can use Keyloggers To Hack Accounts How Hackers Can use Keyloggers To Hack Accounts

Accounts password hacking with keylogger guide for securing. Keyloggers is the best software to hack the accounts of victims that through re...

Read More
Newer Posts Older Posts Home

Categories

Airtel Free Internet Amazon Trick Android Tricks Computer Tricks Customize Deals & Earn Download Trick Facebook Facebook Phishing Fb Tricks free Free Inrernet FreeRecharge Trick Idea Free Net jio Trick PC Security PC Tricks Phone Safety Reliance Free Net Tricks For App Tricks for Earn Tricky Tricks Vodafone Free Net WhatsApp Tricks

Whatsapp Update

Join Us On Whatsapp Send Your Name to +91 7873123457 For Getting Add in Our Broadcast List.

Follow Us

About Me

asish p
View my complete profile

Featured content

About This Blog

Featured Content

Navigation

Blog Archive

  • ▼  2018 (9)
    • ▼  May (1)
      • FACEBOOK PHISHING By X-Shadow - 100% WORKING 2018
    • ►  March (7)
    • ►  February (1)
  • ►  2017 (37)
    • ►  November (6)
    • ►  August (8)
    • ►  June (3)
    • ►  May (2)
    • ►  March (5)
    • ►  February (11)
    • ►  January (2)
  • ►  2016 (131)
    • ►  December (13)
    • ►  October (3)
    • ►  July (3)
    • ►  June (8)
    • ►  May (10)
    • ►  April (17)
    • ►  March (44)
    • ►  February (30)
    • ►  January (3)

"© Copyright 2014" Eleven 40 Blogger · All Rights Reserved · And Our Sitemap · All Logos & Trademark Belongs To Their Respective Owners·
Template Developed By Blogging Recipes.